

How To Install Kitchen Counter Laminate
Start, measure your bodily corner. Do not assume that information technology is a ninety degree bending. Any variance will allow for your cutting to be wrong. In one case you mensurate your corner, divide information technology in half and that would be your actual angle. (in other words, if your corner is actually 90 degrees, your cut would be 45 degrees. If it is 92 degrees, your cut would be 46 degrees). You can buy a kit that will allow you lot to "clamp" your corners together. Assuming you are cutting with a circular saw, buy a bract that has the most teeth that your saw can accomidate. Usually a lx tooth bract would work. Clamp something sturdy like a iv pes level against the countertop with clamps, so that the round saw fence will ride along that straight edge, which usually makes a much straighter cutting. Identify duct record along the cut line that you are going to make. This will help to prevent any "chipping" that may occur. Utilise the longest level you have to measure/level your cabinets without countertops. If your cabinet doesn't have a very slight pitch towards the external side of kitchen, shim the countertop so that they practise and so. The reason for this is as water sits on the countertop, this (over again I say VERY slight) pitch will permit water to run towards the floor, and not back confronting the wall/backsplash. Use a standard adhesive that tin be placed on superlative of the bottom chiffonier walls, and the countertop can sit on. So, find some strategic places to place some wood screws through the bottom of the cabinets into the countertop. It is VERY important to not place a screw that is longer than the thickness of what you are screwing through and the depth of the countertop. The screws are zip more than to put some resistance to the countertop to secure to the cabinets. The mucilage you use volition do about of the work. If you lot place them at an angle, this will take more distance when you place them. Use a silicone based caulk when you caulk against the wall to deter breakdown from the water that will splash upon it.
Great guideance from Straight Nails. I am not surprised at the locals avoiding the task. Ive never known an installer or custom store to accept on "post form" counter tops and do the miter joint themselves. Run a risk is high for a miter cut.. and the whether they can become a smooth joint w/o a bolting system. Ive never seen/heard of anyone but the counter peak vendor make this cut. The miter cut is not merely about the cutting, just they bore holes in the bottom side for the use of clamps to pull the counter top together to hold the mucilage.. as information technology dries. Y'all may desire to ask your home eye if y'all could bring the tops to the vendor to accept them make the cuts for you. Installing would be much a chip easier thereafter.. or at the least, it would be easy to find an installer.
![]() 3po3
3po3
My husband installed ours and he is not a carpenter, simply a Mr. Set It. Not bad communication on the tape to become a smoothen cut. Hubby's rule is measure twice and cut in one case.
you must cut from the back side of the tiptop when cut. Likewise use a new highest molar count carbide trim bract that will fit your saw. install a guide board with tiny screws fastened to the top to keep your saw exactly where you lot desire it to exist. You cannot follow a pencil line close enough to non take a gap when both sides come up together. I have done several of these cuts before and they all plough out fine. The biggest flim-flam is to be sure you are cutting the bending correctly . I would suggest that y'all take a 2 pes wide past half inch thick plywood section to mimic the top and place the plywood into the corner with one section overlapping the other. Then screw them to make your corner angle. Then from where the inside and outside corner meets draw a line from each and cutting exactly from corner to corner. so take out the screws and place each panel onto the laminate slab and you now accept your exact cut to transcribe onto the new slab. Move each template back the altitude that your saw base requires, (typical saw bases are two.5 inches abroad from side of blade) spike each template and use its bending as the guide for the saw. Y'all volition get an exact angle cut that will perfectly match. Another method of making sure you get a tight friction match is to later on cutting accept a direct router blade set the counter at the proper angle with just enough space between each border so but a 1/16th is removed from both sides at the same time. This volition make the joint very tight. But if yous follow the template method, employ a new multi tooth bract for trim your cut volition be very abrupt and the articulation volition be as pocket-sized every bit it tin mayhap go.
![]() Linda
Linda
![]() Linda
Linda
This is one reason why I prefer to work in tile....big miters are avoided. and complex angles tin withal be used 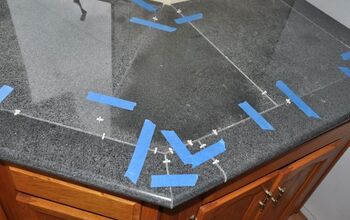
![]() Linda
Linda
Linda, I have a device chosen The original miter angle that is a groovy tool to measure corners. I have different sizes to use depending on the size of the project. There is also a way to measure a distance down each wall, so measure between the two points to calculate the angle degree, just I cannot remember how to do that. One time I remember, I will ship some other note.
![]() Linda
Linda
![]() Linda
Linda
![]() Linda
Linda
Too bad, nosotros would love to run into the finished product. Glad y'all found someone to assist you with this....
![]() Linda
Linda
![]() Linda
Linda
Looks good... nice choice of faucet hardware...
![]() Linda
Linda
![]() Lola
Lola

Source: https://www.hometalk.com/diy/kitchen-dining/q-any-suggestions-for-installing-laminate-counter-tops-162137
Posted by: walkersolds1992.blogspot.com
0 Response to "How To Install Kitchen Counter Laminate"
Post a Comment